Classroom Management in the Library (Part 2). Effective Behavior Redirection Strategies

Hello Library Friends, 

In my last blog post, I discussed the creation of routines and procedures that teachers (and librarians) can use in their learning spaces using strategies from the Teach Like a Champ book by Doug Lemov. 

 If you are interested in the Teach Like a Champ book, I greatly recommend trying to locate it in your public library system. This book provides excellent suggestions for classroom management, which are helpful for anyone who works with youth or teens, including teachers, or librarians. For me, classroom management training was very helpful in establishing a routine and structure in my school library that helped all my students be their best selves. Although classroom management as a concept is well-know by teachers, I see tremendous benefits it can offer librarians who work with youth or teens. 

In my first blog post, I discuss what classroom management is, and what it can offer librarians working in school and public library spaces. This blog post will discuss something different, how to create effective behavior redirection strategies for when things begin to become difficult with one or more youth you are working with, or responsible for. 

I will begin by saying that behavior redirection is very difficult when you are working with children who are not your own. When we are responsible for other family’s children, we need to use strategies that are respectful, responsible, and safe to everyone. It really helps to have some strategies thought through before an awkward or emotional situation, so that you are empowered to respond in a way that is honoring to the library, yourself, and the youth you are responsible for. It can also be a great way to turn a negative moment into a positive one by establishing safe boundaries while building positive relationships with youth. 

The following are strategies that I use in my school library when working with youth. As a librarian who also has worked in public libraries, these are strategies can be effective in public library spaces as well. The numbers I included with each strategy I discuss are the Teach Like a Champ strategy numbers in case you want to look them up online, or in the book. 

Least Invasive Intervention (Strategy #53) 

Children or teens might engage in behavior that is not productive for them or others for a variety of reasons. As you build relationships with students in your class, or in your library program, you can begin to understand those reasons more, and accommodate them. 

For example, one student I used to teach had many sensory needs. I learned that he did much better if I warmly greeted him by the door, and asked him where he would like to sit. He often needed to think about this, but when he chose, I made sure that he could sit where he asked to. Also, if I noticed him getting upset, I would stand close to him, and ask other students to give him a few moments without chatting with him so he could collect himself. When he was ready, I would say something encouraging to him, and to his peers seated nearly, and then I move away to another part of the room. 

Sometimes, however, a student needs to stop a behavior they are exhibiting to be respectful, responsible, or safe. 

This is the moment when many of our hearts race, because we as adults need to step in, but we worry about the situation blowing up. The “Least Invasive Intervention” strategy works because it allows the adult to do the least noticeable action to redirect the behavior.  

The “Least Invasive Intervention” strategy often is going up to the student and whispering to them. You simply ask them to choose the correct behavior.  Then, you walk away, and continue leading the lesson, or the program. 

That’s it. 

Whisper, and walk away. 

By whispering to them you are not making your intervention a scene. Students nearby do not hear what you say. You are whispering, showing that you are calm, and in control. You are protecting your student’s privacy. You simply are asking them to change their behavior. And, then you leave. 

No arguing. Just whisper, and walk. 

When I first heard about this, I almost laughed, because I really didn’t believe that students who change their behavior just because I whispered to them. But, I tried it, and it worked. 

Sometimes, the behavior stops, and then it starts again. I whisper, and walk away again. If the behavior keeps up, or if it escalates, then I change my strategy. However, whispering and walking away works almost every time. 

Whispering is not the only way to do this. Basically, whenever you need to redirect a student’s behavior, think about how you can do it in the way that least impacts others. How can you do it so that others, who are a few feet away from you, might not even know who you are saying? That is the least invasive intervention. By using it, you are protecting a student’s privacy, and helping them make a better choice for their actions. 

Do It Again (Strategy #39) 

The “Do It Again” strategy is very useful when a student is making a choice that is not fulfilling your expectations of respectful, responsible, or safe. When this happens, I stop. I remind them of the correct behavior, and then we practice doing the correct behavior. We practice the correct behavior over, and over, and I encourage my students to get faster at doing it every time. I try to turn it into a game, with big smiles from me every time we as a group make it to the correct behavior. 

Here’s one example. In 2020, I had dots on the floor of the library spaced out 6 feet apart. When students lined up they each needed to stand on one of these floor dots. I explained how this worked to all of my classes, and why we needed to do it (to keep us safe). My students practiced getting to one of the dots quickly when it was time to line up. 

A few weeks later, a class came into the library. I asked to line up, and some of the students stood on their dot, but some were wandering around the library, not on any dot. I clapped my hands, and told everyone to stop. I reminded them how to line up. I then told them to line up again. I waited until they all did, which took several minutes. I told them that was not as fast as I had seen them do it, and that I knew they could do better. I told them we would be practicing for a while. I told the students to walk to another part of the library, so they were all scattered around the room. I clapped my hands, and told them to line up. They quickly lined up on a dot. I gave everyone a big smile, and words of praise. We repeated this procedure several times, with me making sure to reward them with praise and smiles each time the class was successful. 

My students learn that I actually mean what I say, that there are reasons for my requests (we all are expected to act in ways that are respectful, responsible, and safe) and if I ask them to do something, I will hold them to it. 

Delayed Consequences (not a Teach Like a Champ Strategy, but really helpful)

Maybe once or twice a year, a student will demonstrate a challenging behavior, and the behavior catches me off guard.  I might be in the middle of another interaction, and I just do not have the ability in the moment to assess what is going on, and how best to respond. However, even though I might not be at my best, the behavior still needs to be addressed. 

In these kinds of moments, I use the “Delayed Consequences” strategy. It takes the stress off from me to not have to come up with my response in the moment. 

If a student demonstrates a challenging behavior, and I am not sure in the moment how best to respond, all I do is whisper to the student, “I am disappointed that you just made that choice. I will be thinking about how to address this. But, don’t worry about it. I’ll let you know what I decide.” 

I then smile, and walk away. 

What this does is let the student know that I will be following up. This isn’t over. There will be a consequence, but they don’t know what it will be, or when it will happen. I usually wait a few days before I address their actions. Every day that I see them, I make sure to come over to them respectfully, and say that I am still thinking about what happened. I don’t know yet how I am going to address it, but I remind them not to worry. 

The beauty of this is that they are thinking/worrying about it the whole time. I am showing them that I am in control of my emotions, and of the situation. In the meantime, I discuss what happened with my supervisor so they know what happened. Often, they will have great insights that I would not have thought of by myself. They also help me see different perspectives. Sometimes, there are different influences going on with the student that I don’t know about. By asking for help from other adults, I am opening myself up to learning if there was something I could have done that was more accommodating for the student. If there are things I could do differently that might be more effective with this student, I make sure to make those changes right away. 

Whatever the consequence is for the behavior, I make sure that my principal knows what I will say to the student when I address the situation with them, and that they support my decision. Depending on the severity of the situation, I have had colleagues who will use this strategy, and then set up a meeting with the principal and the parents to formally address the student’s behavior.  

However, in my three years at the public school, I have only had to talk with the student,  and no other adults were needed at our meeting. I usually talk to the student in a public space in the school where we can talk quietly, but still be seen by others. If I am going to change anything in my teaching to make the library a better environment for the student, I make sure to tell the student that so they know I want them to be successful, and that I am willing to change what I do to make that happen. Almost always, the only consequence that I will give is to ask to the student to tell me what respectful choice they could have made, and then to help do a task in the library, like sanitizing tables. The purpose of the task is to give them a chance to give back to the school in a positive way. 

This is not a day-to-day strategy. I reserve it for unique situations when I am not sure how to respond. These situations might come up once or twice a year. However, it is always comforting to know that I can use this whenever I need to, and it will allow me to address the moment with my student in a way that is fair, but also puts me in control of the response. 

Reflection: Set yourself up to be successful 

Classroom management is a game changer. When we work with youth, they can behave in ways that are unexpected. Planning ahead of time how we will respond to behavior that we need to address is one way to help empower ourselves to be our best selves. 

For me, classroom management in my library is a way of thinking that believes the best about my students, and prepares a plan, before my students walk through the library doors, for how I will joyfully support great behavior choices, and calmly address behaviors that need to change. And most importantly, throughout all this work, positive relationships are built in my library space as I see the best in my students, and they see the best in me, and in one another. 

Take care, 

Emily

Classroom‌ ‌Management‌ ‌in‌ ‌the‌ ‌Library‌ ‌(Part‌ ‌1).‌ ‌Routines‌ ‌and‌ ‌Procedures‌ ‌

Hello Library Friends, 

It has been quite a while since I published a blog post. I hope you are all doing well, and that your libraries are transitioning in a strong and positive way as library services are opening up more and more across the nation and world. 

I will be publishing a two-part blog post on classroom management, in honor of our upcoming school year. This first post will go over routines and procedures that librarians can use in their programs. My second post will discuss behavior redirecting strategies to address challenging youth behavior.

Classroom management might seem like an odd topic for my blog, especially since I know that many of my blog readers represent public library youth service librarians, and classroom management as a concept is mainly reserved for school instructors. 

However, now that I am entering my fourth year teaching as a 4K-12 school librarian (after six years in the public library world as a library assistant, and later as a youth service librarian), I feel that classroom management can be a missing piece in library training. Regardless of our position, most librarians interact with youth or teens for at least part of their day. Having classroom management training can be empowering for library staff, because they know that they have pre-planned ways of responding respectfully to youth, instead of reacting to challenging behavior. 

In the public library world, I benefited greatly from multiple trainings provided by DPI and the Youth Service Section of WLA. However, I don’t remember any of these trainings explicitly covering what to do when a student showed behavior that was unsafe.  

It wasn’t until I transitioned to the school librarian world that I received formal training in classroom management through attending a “Teach Like a Champ” workshop based on the book by Doug Lemov. It helped me immediately feel validated. The training helped me realize that  what I was doing by instinct was correct, and it put several other strategies into my routine that have been very helpful. 

Classroom management is a term used to describe how a teacher (or librarian) mangages children or teens they are in charge of.  For me, classroom management is everything that the teacher (or librarian) does that helps youth be their best selves while in any learning space. How they plan before the program, accommodate, and redirect youth all falls under how the librarian, or teacher, manages the room. 

I highly recommend the Teach Like a Champ book, which you can purchase online, or can find through your public library systems. The book also comes with a DVD, which allows you to watch how a teacher models each strategy in the book in a real classroom situation, which can be very helpful. 

Remembering back to how helpful it would have been if I had any formal classroom management training, I wanted to share several of the Teach Like a Champ strategies addressing routines and procedures that I use in my school library regularly to help my students be their best selves. The numbers I included with each strategy I discuss are the Teach Like a Champ strategy numbers in case you want to look them up online, or in the book. 

Threshold (Strategy #41) 

This strategy is one of the best procedures I have to build relationships and show all my students that I value them. The “Threshold” strategy means having a routine for how you greet your students as they come through the door of your library. This is my moment to build relationships with them, and to communicate my expectations for their behavior. 

When students come through the door as a class, I meet them at the door. I smile, and greet them by name as they enter. This accomplishes multiple purposes all at once. First, I am showing them through my smile that I am happy they are in the library. Secondly, I am showing them that I know who they are by saying their name. Third, I am able to remind them to demonstrate respectful and safe behavior.  If a student tries to come into the library screaming, or pushing another student, or any other behavior that is not safe or respectful to others, I smile, and whisper to them that they need to try that again. I direct them to the back of the line so they have another chance to re-enter the library as their best self. 

When they come to me again, I make a point to smile twice as big, say their name, and welcome them into the library. 

What this does is show that I am in control of the moment. I will wait for them to enter the library respectfully.  They want to come in, so they are willing to do what I am asking (to act in ways that are respectful and safe). 

This can look very similar in a public library. You may not know all the names of the youth who come to your programs, but you can greet them by the door, and offer them a handshake, or a high five, or whatever you are comfortable with. It makes a big difference, and it immediately sets the tone for a great program. 

Do Now (Strategy #20)

This is a game changer for classrooms or programs. The basic idea of a Do Now is to have a short assignment or activity that students work on individually as soon as they enter the room. They come into the door, and then they start on this assignment. In the school world, this gives me 10 minutes to welcome all the students by name as they come into the door, take attendance, ensure I have all my teaching materials, and answer quick questions students might have before reviewing the Do Now assignment that everyone would have just completed.  

Otherwise, students come into the class talking, and possibly engaging in other behaviors that are not as productive. Not all students do well when they are in a loud space. This quick assignment means that we start the class off quietly, and that I have time to do the administrative tasks that I need to do before I start my longer lesson. 

In the public library world, I can see this working a little differently, but with the same concept. Having a word puzzle on a half sheet of paper, for example, and asking students to work on it as you greet everyone who comes in (including those families who arrive a little late) gives you a chance to have something for the kids who arrived first, knowing that students will arrive at different times. 

Another idea is to have a Lego building challenge, with Legos on the tables of your programming room. Have a building challenge, and let students know that they only have 10 minutes to get it done. When you have finished greeting everyone who is coming in, stop the “Do Now” challenge, and have students share what they did with the Legos. Then, get started on the program. 

Circulate (Strategy #24) 

Teaching, or leading a library program, can be physically demanding. Although I am a fairly in-shape person, my feet actually hurt quite a bit when I am teaching. I am on my feet for most of the 8 hours I am at school. Knowing that, if you feel physically comfortable with this, this strategy has huge benefits. “Circulate” means walking around the room, in your student’s space. Instead of teaching at the front of the room like a college professor, you are actually walking around the tables where you students are, and teaching from there. I have noticed that the closer I physically am to my students, the better they do. It also helps me establish that our room is a safe learning space. If a student drops something, like a pencil, I pick it up for them, and smile. Because I am “everywhere” there is a sense that the whole room is valued and included. Also, since I am moving around, it is much easier to look over the work my students are doing, identify misunderstandings, and provide feedback and praise. The idea is to move from the front of the room (your space) to where they are sitting (their space). 

No Opt Out (Strategy #11)

This technique helps ensure that everyone knows they are a valuable member of the learning community, and that I expect everyone to share when asked. In my library lessons, I might call on a student and ask a question. If they say, “I don’t know” or give me a shoulder shrug, then I call on another student. If the second students gives me the correct answer, I go back to the original student, and ask the question again. They have just heard the answer from one other peers, so I know they can tell me. I ask them to tell me the answer, and then I celebrate their success with a huge smile. 

This is really effective, because it shows that I believe that everyone can demonstrate high levels of learning. I ask my students not to say, “I don’t know.” However, anyone can say, “Just a minute” so they have time to think about their response. Thinking time is always allowed, and encouraged. I just make a note to get back to them, and I continue teaching the lesson. When they are ready, I ask them the question again. 

When I was in school, I remember my heart actually pounding when a teacher called on me. And, sometimes I didn’t know the answer. But, the process of answering a question in front of my peers built confidence. I haven noticed that some students want to continually opt out. However, I have had some students who change because of this strategy. By speaking up in class, I am including them in a far more engaging way than they have been included before. I am showing them at I believe in them, and I will keep believing in them (and asking them to answer questions). I have had students who begin to believe in themselves more, and they will begin sharing their observations and insights on their own after several weeks or months. It is a huge success, and a sign of growth for them. 

Work the Clock (Strategy #30) 

Having a sense of time, and that time is passing, can be a huge mindset changer for all of us. Knowing how long we spend on any particular task can help us assess how we are investing our time, and how we can do better. “Work the Clock” as a strategy means having some timer visible to your students during your lesson, or library program. Give them specific times to get certain tasks done, let the timer beep, and then move on to the next part of your lesson or program. 

This took a bit of work for me to understand how much time to put into some tasks. I was overestimating, and underestimating all the time. However, my students were gracious. I gave them more time when they needed it, and they gave me another chance to end a task early when they were ready. Once I figured out how much time things should take, this strategy helped me keep the pace up and one activity leading quickly to another, with minimum wasted time. 

In the public library, I can see this being very helpful for any program where students have independence in the program’s pacing. If you are doing an escape room, for example, it can be very helpful for them to know how much time they have been working on a puzzle. I can also see this being helpful for Storytimes, discussing counting, and even timing frequent songs or stories. 

Make Compliance Visible (Strategy #52) 

We have all been there. You try to lead a lesson, or program, and you have multiple steps your students need to follow. Some students are following, some are doing something else. Sometimes, having everyone at their own pace is okay, sometimes it really is not. For the times when it is not, this is a great way to keep everyone on track with you in a way that minimizes frustrations. “Make Compliance Visible” means giving instructions that you can see. 

For example, if you are doing an unplugged coding program, where students are writing code on a piece of paper using pencils, start by asking everyone to “hold up your pencils.” You can actually see if all the students are doing this, which is what makes “compliance” visible. There will be students who drop their pencil, or accidentally break it, or whatever. All of those challenges would be there, even if you did not ask everyone to hold their pencil up. Imagine, though, that you are the student who just broke the pencil lead just as the librarian was giving the next step. You can’t follow along, because you don’t have the right tool. 

By stopping, and having everyone hold up their pencil, you are getting everyone on the same task, while also doing a check to make sure your students have all the tools they need. Until all the students are holding their pencil in the air, you as the leader do not move on from this step. You are making sure that everyone has what they need to do the next step, and that they are looking and listening to you. 

For the students who need a new pencil, you can give them that while everyone is still holding their pencils up. Once everyone has what they need, you do a check. Is everyone holding up their pencil? Yes? Great, move on to the next step! 

I repeat this strategy probably a dozen times per lesson. Anytime that I need everyone to do the same activity at the same time, I use this strategy. 

Precise Praise (Strategy #59). 

When you tell a student “Good job!” you are praising them. When you say, “You are a really hard worker for problem-solving how to insert a photo in your presentation” you are giving precise praise. Precise praise lets students know exactly what they are doing well. 

All of us like to hear we are doing a great job. But, what is more engaging, a note on our desk that says, “Thank you for working here” or a note that says, “Thank you for asking me about how my day was yesterday, and then for really listening when I told you”? I think the second option. Our students are the same way. They want to know when they are succeeding. If we do not tell them, then they don’t know what to keep doing, or working on. 

Joy Factor (Strategy #62)

This procedure and routine is something I do for myself. 

When my students come into my library, I want them to feel the joy that radiates from my life, into theirs. I enjoy my life. I enjoy libraries. When I was in high school, when my mom asked me what I wanted to do that was special for my birthday, I answered that I just wanted her to drop me off at the public library, and allow me to spend as much time as I wanted there just browsing around. We often went to the library as a family, but when my mom was ready to go, all of us kids needed to finish making our selections so we were ready to go too. I wanted time to just look around without having to leave before I was ready. 

Later, when I graduated high school, I wanted to work in libraries in youth services, but I thought that there were no real job opportunities in that field. I started college as a music major, but quickly realized that was not where I wanted to be professionally. I started working in libraries by accident. It started with me leading a volunteer drama program over the summer at my public library, then being offered a part-time job as a library assistant. From there, I transitioned to a new public library when I moved to a new town, and was soon offered a job as a youth services librarian. 

Three years after that, I was asked to apply for a local public school’s library position. And, even though I had no formal teaching experience, I was hired. I am so thankful to work with youth in the library. All throughout the summer when I am not teaching, I am researching and developing lesson plans and projects to do with my students. 

My point in telling these stories is to possibly help spark memories in your past that lead on the path you are now in library work. What were the moments, the relationships, that encouraged you to pursue a path in libraries? 

Remembering those stories is important for me, because there are bad days. As much as I am thankful to work with students, there are some students who are challenging. There are many days when I come home emotionally drained, and often my body physically hurts. Even though I work to be in good shape, I can get exhausted from standing all day. 

In those moments when I struggle in the library, I move into my “Joy Factor” routine and procedures. I notice how I am feeling. I take a deep breath. I look around, and notice a student who is doing something wonderful. I compliment that student, and smile at them. If my whole class is there, then I smile at my class. Sometimes, that is all it takes for my Joy Factor to come back, and if my smile was forced the first time, now I am smiling for real. I can even laugh at what was frustrating me a moment ago. I can get my students to laugh. I can enjoy them at that moment. We take a breath. And then, we get started on the lesson again. 

Another routine that I do for myself is to write down three positive things that happened that day in the library. I am training my brain to notice, and remember, positive events that happened, and to mindfully be thankful for them. I would rather train myself to remember the good moments, rather than the challenging ones. 

My students see it. The joy is real, but the seeds of joy need to be planted, every day. It is a choice to choose joy, so it is a choice that I intentionally build into my routine. 

Reflection: Setting ourselves up for success

I hope these notes about classroom management have been helpful, and if nothing else, I hope that it reminds you of practices you are already doing in your teaching or library work that helps students be their best selves.

If you want to learn more, please check out Teach Like a Champ from your library system, and look it over. Even incorporating three new strategies each year can be an effective way to transform your library programs and make the most of every moment with your students, or with the youth who come to your library programs. 

Stay tuned for my second post on classroom management in the library, this time, covering effective behavior redirecting strategies. 

Take care, 

Emily 

STEAM Workshops on a Budget

On Thursday, February 14, 2019 I had the privilege of presenting at the WCCAA (Wisconsin Child Care Administrator’s Association) conference in Madison, Wisconsin. I was wowed by this awesome group of child care professionals working every day to care and educate children.

Here is my PowerPoint where I shared STEAM (Science, Technology, Engineering, and Math) programs I organized and lead at Brewer Public Library and Ithaca School District’s Library, along with links to lesson plans on this blog.

Happy reading, and please, share your STEAM ideas with me!

2018 Reading Challenge

Last January I set a reading goal for myself: 104 books before the end of the year. I had only read that many books one year before, when I was a sophomore in high school. The personal challenge happened softly towards the end of January 2018. I had just discovered the convenience of Libby, Wisconsin Public Library Consortium’s app for accessing ebooks and audio books. I found the function within the app to speed up the narration double time while listening to audiobooks. Using that function, I listened to Anne Sewell’s Black Beauty while running on the treadmill. Then, for the first time, I logged the books in my Goodreads account while cooling off from my run. While recording the title of the book, I wondered if I could read 104 books this year, averaging two books a week, using Goodreads to keep track.

I didn’t even make it an official goal. It was just something I wondered if I could do while working full time, taking full-time graduate school classes, volunteering in our community, and being a mom to my two sons. I decided to not tell anyone about my goal, and instead keep track all year of which books I finished to see how far I would get.

What began as a soft pondering turned into a full-fledged promise when I became a school librarian and 6th grade reading teacher this fall. I challenged my students to read 40 books this year, after a similar challenge presented by Donalyn Miller in her book, The Book Whisperer, and helped my students create reading notebooks to keep track of the books they read, their own version of the Goodreads logging activity. I created my own Reading Notebook, and began to keep track of my reading with my students, showing them I was not asking them to do anything that I was not willing to do myself while also sharing stories of how I find time to read, even with my committed schedule. Each week when I finished a book or two I would give a short book talk on the books I just read for my students, and then ask who wanted to read those books next. The titles were always quickly snatched up. The children we serve notice if we believe in the power of reading ourselves. We may be their biggest, or only, reading role model. We can not let our moments with them slip away without inspiring to believe that there are books out there they will love.

Now that the year is over…yes…I did it. I read 109 books in 2018. While it was time consuming, it was doable. I found that the best way to read was to fit it in between other activities, making reading not something I chose over other activities or commitments, but something I did while working on other activities or in moments of waiting. I was not interested in every book I read. Instead, I chose titles that I wanted to be familiar with so I could recommend them to my students. In so doing, my reading became as much for my students as it was for me.

Here are some tips that I picked up over the year reading. If you would like to check out what I read in 2018, here is my Goodreads page. I already started another page for 2019!

  1. Use the Libby app, available from Overdrive. Here in Wisconsin Libby is connected to our Wisconsin Public Library Consortium. If you are in another state, you may have the same access, or another service that is similar. All you need is a public library card. From a user’s perspective Libby is beautifully designed and makes placing holds on ebook or audiobooks very easy. And, the holds automatically are returned to the library as soon as your lending period is up, so you never, ever, have to worry about fines! Also, you can link multiple public library cards to your Libby account. I linked my husband’s and sons’ library cards, and can place 10 books on hold for each card. If I have a few books already checked out, I suspend some of my holds so that I move to the first person in line, but the hold does not come to me until I make it active. This ensures that I always have a new book ready for me.

Tip: Libby defaults to allowing you two weeks to borrow an ebook, and one week for an audio book. If you want more time, you need to log into the Wisconsin Public Library Consortium webpage using your library card number and your PIN (if you are not sure what your PIN is, call your local public library). Navigate to your account, then settings, and change your lending period to up to four weeks for ebooks and two weeks for audio books.

  • Utilize audiobooks. Find opportunities to listen to audiobooks while doing other tasks. Instead of listening to music while running or bicycling, I instead listened to audiobooks through Libby. I turned the narration speed to double which meant that the words were going about as fast as I was running. It took some getting used to, but now I love it. If double-speed is not for you, consider just listening to audio books while you prepare dinner, clean your house, or work on other chores. I began doing that, and it made household “chore-time” into “me” time. I was transported into the story I was hearing, and it made me feel that I was taking time for myself, while doing tasks that needed to be done.
  • Consider purchasing a Kindle Paperwhite. This changed my reading life. You can read all about Paperwhites on Amazon, so I will not repeat that information here. Yes, they are expensive, but there are sales throughout the year. I will say that the Paperwhite allowed me to always have a book with me, and that made a huge difference. I would take out my Paperwhite and sneak 5-15 minutes of reading in while waiting for my husband or sons at various moments. Those minutes added up! The Paperwhite is very light and has a long battery life, which makes having it with me and ready to go easy.

I would love to hear about your reading goal for 2019! Let’s inspire one another through books!

School and Public Librarians: Warriors for Literacy

Hello library friends,

It has been several months since my last blog post. I have missed interacting with you, my colleagues and friends, on this space during my hiatus. I am happy to now be back! I missed blogging not only because it offered a professional way for me to connect with and build friendships in the library world, but because it provided me a tool to reflect on my work. After a program or new initiative, I would sit down and ask, “Did this program accomplish my goals? The goals of my audience? What went well? Do we want to offer this program again? What can I do differently next time to make it work better for different ages?” Blogging gives me a reason to reflect.

I have been reflecting a lot lately on the differences between public and school librarian’s work. This is due to the fact that during my blogging break, I went through a job change from Brewer Public Library to Ithaca School District school library. I went from serving a service population of 15,000 to now serving a community of 450 4K-12th grade students, all in one building. While I deeply miss the staff, families and children that I developed wonderful friendships with while at the public library, I am also so thankful for this change and the work I am doing now in schools.

I wanted to use this space to communicate some lessons that I wish I had known when I was in the public library world about the work that school librarians are doing.

First of all, even though it now seems obvious, I did not realize at first that school librarians are teachers. At the public library, on certain days I might organize and run as many as four programs a day, but mostly I only ran one or two. In the school library, I have six to eight classes coming into the school library every day. I do have freedom to organized how I teach the Library curriculum, but the time is limited.  My classes run every day, and I have only 40 minutes with each class each week to reinforce concepts of reading that are also being taught by other teachers in their classrooms. That means that my lesson plans need to be very focused with specific learning goals in mind. It also means, that my lessons plans build on each other for a long term.  Unlike the public library programs that are usually presented as completed block of learning to students who may (or may not) return, the school librarian teaches the same students for an entire academic school year.

I always wondered where the “shushing librarian” stereotype came from, but now I know. It is the school librarians who were the first, and sometimes, the only librarian in the lives of students who become parents. At the public library I was blessed to have a director who let my youth programs be as loud as needed. In the school, that is simply not an option. My school is so small that there are not enough classrooms to fit everyone, so one study hall per period is in the library. I will teach a class of 4K-6th graders in one half of the library while a study hall is held in the other half of the library room. I can not let my students be loud because only a few feet away are middle or high schoolers trying to get their homework done. This means that I need to do something I never asked students to do at the public library: I ask them to speak quietly and I have to “shush” them when they do get to loud. I also need to speak quietly myself when I am reading a picture book aloud now. It is really hard. Learning and reading should be exciting, and when we are excited, we naturally talk louder. It is hard to put a damper over that fire.

Another consideration is that school librarians are not able to leave the building in the same way that public librarians can. I know that this can differ from one public library to another, but it is a consideration that school librarians are expected to be in the building with their time accounted for each minute. Leaving the building is often just not an option. For collaboration between the public and school librarian to happen, often, it will work best if the public library can reach out and meet with the school librarian through video or phone meetings, or going to the school, if possible.

School librarians see the practical problems of literacy needs within a wide variety of students they serve. For most of the children I serve in the school, the school library is their only library. Many of my students do not have many books in their homes. Many of my students have never been to the public library.  I do my best to have great books available, including books that are required in classes, but it can be challenging when multiple students want or need the same copy of a book. It can take weeks for the new books I order to arrive since I also order processing. For the student waiting, those few weeks can be the difference between encouraging reading and losing momentum.

I realize that many of my students may never visit their public library or a physical bookstore, for a variety of reasons. For these children, the school library is their only access to books. Can this be changed? Can visits to the public library become as normal as stops to the grocery store or the laundry mat? I know that they can. I see great work happening in public libraries to address inequities, including eliminating fines and doing outreach library programming in the community. I also know that public and school librarians have great insights because they see challenges from different perspectives. Let’s use that knowledge we both have in our libraries to creatively imagine solutions to barriers.

I want to take a moment to applaud my public library colleagues who have advocated diligently to begin making a cultural shift in libraries away from collecting fines. Unintentionally, I think that in public libraries our actions communicated that we valued fine money more than relationships with our patrons. I know this was never true, and yet, I often have parents talk to me that they did not use the public library in the past because they felt unwelcomed, or shamed, because of past fines. Thank you to everyone who is working to communicate the message that one of the libraries’ first priorities is to put books in the hands of kids.

Another success story that I hear is public and school libraries working together so that families can return their books at either location, and the books will eventually make it back to their home. This is a powerful partnership that communicates to families that libraries are working together to make accessing reading material, and retuning books, easy.

In the public library world, I worked hard every day to find ways to promote our library services and resources in ways that reached more people and were more effective. In the school library, I do not need to worry about outreach in quite the same way because the children are coming to me on a daily basis.  At the same time, I work just as hard to make sure the library remains a magic place in their imagination.

The outreach programs at public libraries serve the same function of creating that sense of magic for children who attend them.  But these “magical moments” only work when the children and parents come. We know what the challenges are. Thank you to everyone who is working to turn deficit thinking around, and see challenges as possibilities for positive change and growth. Neither the school nor public librarians can meet the reading needs of our community’s students alone. Students need literacy warriors willing to imagine ways to team up together to address challenges.

When I was in the public library, I wish I had know how meeting with the school librarian could go a long way toward finding ways for us each to do what we do best, but differently. And, I believe now, more than ever, that public and school librarians have power to effect great change in the reading habits of the children they serve, especially when we can partner together. We are going up against decades-old challenges and barriers to literacy access.  For the families and children we serve, we are literacy warriors.

Keep reading, my friends!

Emily 🙂

Mini Golf in the Library!

Libraries are not just about accessing books, DVDs, and magazines. They are spaces where positive interactions between children, their family/friends, and library staff take place and memories can be created. They are also places where ideas are presented. Kids can come, interact with those ideas, and then take those ideas home with them to be further read about, experimented with, and used in their play.  For that reason, I totally felt that setting up a mini golf course in the library was something we needed to do this summer! It was very inexpensive and completely fun!

I also feel that one of our missions as librarians serving youth is to demonstrate for kids and parents how to play using simple materials that they already have. That way, the families can use our ideas to re-create similar experiences and keep the learning going once they get home. This really hit home for me when three parents came up to me while their children were playing mini golf and told me that this is something they would be doing again at home. Yeah!

And, I also feel that the library’s mission is to connect our community to resources that they may otherwise not be able to participate in. For us, the closest option to go to a mini-golf course would be to travel about an hour away, and I wanted to bring this experience to families in our community who otherwise are not able to drive that distance.  It was a total hit!

Here is a video of me walking through our course:

Inspiration: The Sault Ste. Marie Public Library and Maura in the Library were both very helpful in sharing photos of the Mini Golf courses that their library planned. Check them out!

Cost: About $20 to purchase the mini golf clubs that the Dollar Tree was selling this summer and 9 green plastic cups that we used for the “holes”.

Set-up: Our golf course had 9 holes, and each hole was themed using odds and ends from our craft and programming rooms. Kids started playing each hole by placing their golf ball on the green dot labeled “Start Here” and working their way around obstacles to get their ball into the green cup.

9 Hole Mini Golf:
Hole #1: Dr. Seuss
Hole #2: Dinosaurs
Hole #3: Clifford the Big Red Dog
Hole #4: Legos
Hole #5: Chefs/cooking
Hole #6: Star Wars
Hole #7: Travel to all 50 States
Hole #8: Alphabet
Hole #9: Laura Ingalls Wilder/Frontier.

I started off by marking the boundaries of each hole with masking tape, but I soon realized that with kids, their balls would often roll outside of the tape, and we would have golf balls all over the place. So, I found books that matched the theme for each hole and set the books up around the perimeter to form a kind of barrier. It worked great, we just had to re-shelve all the books once the program was done. And, this was a great way to “display” lots of our books!

Another idea to establish a perimeter around your holes is to tape pool noodles down to the floor.

I also had my go-to upbeat song, Shake Your Body Down by Laurie Berkner playing on repeat while the program was running.

Staff: You could probably get away with only one volunteer/staff member being the groundskeeper at this kind of event, but I had several teen volunteers. So, one volunteer took care of the welcome table, where kids came to get their golf club, golf ball, and a scorecard if they wanted one. We found par for the scorecard by just taking my score, but you could also have several volunteers play the course and average their scores for each hole. Here is a Word document download link for the Mini Golf Scorecard and Clubhouse Rules that we had displayed at our welcome table: Mini Golf Scorecard. A second volunteer was in the programming room, and they simply walked around and fixed books or props if they were knocked down by golf balls or golf clubs that got a little too wild.

And there you have it! Mini Golf in the library!


Life-Size Candyland

Candyland! The game of nostalgia and childhood! As much fun as it is to play it as a board game with small game pieces, for the past two years, we gave our community an opportunity to experience this game on a whole new level by building sets out of cardboard to make the board game life-size!

How it happened: Last summer I had over 20 teens hanging out at the library and they asked if there were projects they could help me with. I was not planning on having this many great helpers, and I scrambled every week to find helpful things they could do that they were also interested in. Until, one of them asked if they they could build the sets to Candyland, thinking of how much fun it would be to play the game if it was life-size. Boom! The large project I needed! Teens worked for about 6 weeks to build all the sets, and many of the sets were worked on by several teens coming into the library separately, so there was lots of collaboration. We used lots of cardboard, construction paper, and paint!

We set the game up in our programming room by using just plain construction paper to create the “path” that the kids walked on. Teens also created four dice using square boxes that kids rolled to let them know what colored square to move to. This summer, I had four teens on hand to help run the game, so I gave a dice to each of our four teen volunteers and they would bring a family, or group, of kids through the game. The kids would throw the dice, and the volunteer would retrieve it, and then pass it to the next player. That way the kids never had to leave their square. Also, having four volunteers meant that we could have four groups playing the game at one time. We could accommodate a large crowd this way and no kids had very long to wait as a volunteer would finish their game every few minutes, and then go back to the starting square to pick up their next group of kids who wanted to play.

Music is such a powerful force to set a welcoming tone, and I had Laurie Berkner’s “Shake Your Body Down” song on repeat while families played their way through Candyland. Another song that would also be great is the Lollipop Song.

Here are our sets:

Plum Tree

Mr. Mint 

Gumdrop Pass (made from a tablecloth and sand pails)

Grandma Nut’s House

Princess Lolly

Queen Frostine 

Gloppy 

King Candy’s Castle 

And, that’s Candyland! We saved the sets and the paper squares that kids used as the “path” so this is a FREE program once you have it set-up and you can run it as many times as your community needs! In 2018, we offered this twice during our summer reading program, once on a Monday night and again on a Tuesday morning, taking advantage of the opportunity to only have one set-up and one take-down for two huge programs!

Have you create life-size games at your library? I would love to hear about it!

Star Wars Jedi Training

Jedi Knights have assembled children sensitive to the force to test their Jedi abilities. Under the tutelage of the Jedi masters, the recruits must learn how to use the force to wield lightsabers, discover their Star Wars name, design their own ship, shoot down Storm Troopers, assist in a mission to destroy the Death Star and build their own droid. Come and join us, my young Padawan!

We offered “Star Wars Jedi Training” the third week of our summer reading program and it was a big hit! We offered this on Monday evening and again on Tuesday morning! One prep and set-up for two huge program days! And, only one clean up on Tuesday after the program was done!  Horray! The costs were incredibly low and families wanted to stay at the library playing with all the activity stations for about 90 minutes, significantly longer than many parents/kids usually have the patience for with a room filled with excited people! That alone was a great sign!

The skinny:
We offered our “Jedi Training” as a program with eight activity stations:

Because I really, really, really wanted the kids to be able to take a lightsaber with them when they went home, we also had a final station where the Jedi Master would make a lightsaber for each of the kids once they had completed all the activity stations. The lightsaber was a balloon, like the kind you use to make balloon animals. Perfect for my budget! And, all the kids LOVED them!

I also had our Star Wars books set out in a display, and Star Wars music was playing during the program, definately helping to set the Star Wars mood!

Cost: 

  • About $10 for 250 balloons to make lightsabers, which we did not go through.
  • $8 for a balloon pump on Amazon
  • $4 for 4 pool noodles which we turned into pool noodle lightsabers!
  • $2 for regular balloons which we used in the lightsaber training with balloons station.

And, here is my breakdown for the activity stations:

Welcome Table and Scavenger Hunt: 


We set up a table near the door so we could greet families as they came in. I made up a Training Card with all the activity stations listed and told the kids that to become a Jedi Knight, they needed to complete all the activity stations on their card. A volunteer at each station (or a volunteer who was “hovering” and covering several activity stations) checked off their boxes once the kids were done with the station. Here is a like to my Star Wars Training Card. I also had the paper for the scavenger hunt at this table as well, and I trained in three volunteers to be able to help the kids find the objects in the children’s library. This scavenger hunt was done by Jbrary! Thank you! Kids were able to find different areas of the children’s library by looking for the star wars characters on their Scavenger Hunt, a win-win for everyone! You can access Jbrary’s Scavenger Hunt file and post HERE. If you have a volunteer who can help lead kids around your library looking for the characters, that would be best, as some kids found this challenging. I also laminated the Scavenger Hunt pages. The kids wrote on them with crayons, and a tissue wiped the crayon marking right off! Doing this meant that I only needed to print out the Scavenger Hunt on 10 pieces of paper, instead of 80!

Discover Your Star Wars Name: 

Thank you, again, Jbrary! Okay! To find your Star Wars first name you combine the first three letters of your last name with the first two letters of your first name. For me, Emily Zorea, my Star Wars name is Zorem! I gave kids reusable nametag holders which they filled out and wore throughout the program! It was a great way to begin conversations with kids! Before kids received their Jedi lightsaber at the end of the program, the Jedi volunteer asked kids to give him their nametag so we could recycle it. Some kids wanted to keep their name, so they took out the piece of paper, but I think we were able to collect all the nametags again! I had a volunteer at this station, but you could get by without one.

Demonstrate your design skills at the Coloring Station: 


I found amazing coloring sheets created by Amy at EncouragingMomsAtHome. Thank you! I printed them off, and kids loved them, often coloring more than one! I usually set out coloring as an option for many of my family programs, and it can get a lack-luster response. These pages, though, were so cool that kids stayed at this station as long as any of the others! No volunteer at this station.

Attempt to Sink The Death Star

The Lego Librarian had this great idea! We cut cardboard into a large circle, and two of my middle school volunteers helped me paint it into something that looks like the Death Star! We folded a dozen paper airplanes and kids tried to fly their paper airplanes through a hold I cut towards the top-right part of the Death Star to “sink” it. Lots of fun, and harder than it looked! We had a volunteer at this station, but it basically runs itself.

Design your own Star Wars Ship

I set out our LEGOS, and kids had a blast! Seriously, I always underestimate how excited kids will be to build with Legos, and they had some great designs! I had a volunteer here, but again, this station really does not need one!

Defend Against Storm Troopers: 

Thank you again, The Lego Librarian! I found some images of Storm Troopers online and printed them out so we had two images to a page. I then asked our volunteers to paint toilet paper rolls white and then cut out the Storm Troopers. Then, they glued the stormtroopers to the toilet paper rolls so they would stand up. My son brought his Nerf guns and was the volunteer at this station where kids defended themselves with Nerf guns against the Storm Troopers. You definitely need a volunteer at this station to keep the kids controlled, load the Nerf guns as needed (most kids did not know how) and to teach good shooting range protocol. No one was allowed to shoot if someone was between the Nerf gun and the Storm Trooper. Also, kids lined up in a row and they all fired at once and then walked over to the Storm Troopers to retrieve their Nerf bullet. It kept this station going, but also taught important safety. Kids were told that aiming the Nerf guns at another Jedi-In-Training (or family member) was never allowed, and all of the kids followed this rule. Great fun, even with the necessary rules and safety! You will have kids asking if they can do this again and again!


Build Your Own Droid

Thank you again, The Lego Librarian! I used his templates for the droids, and just set out cup-up scraps of paper and glue sticks Kids designed their own droid! We had a volunteer here, but you could get by without one as long as someone comes over every once in a while to clean up the station.

Light Saber Training with Balloons!

I cut a pool noodle in half, and then taped the ends with duct and electrical tape to create a lightsaber. You can also use sharpie markers to create lots of detail. I marked off a space in our programming room with tape on the floor and assigned two volunteers to lead this station. I found out that this worked best for us when I only had four pool-noodle lightsabers at the station at one time (basically, four kids at a time). I also put four balloons in this station and the goal was for the kids to either balance their balloon on their lightsaber, or bat their balloon up and down for as long as they could before their balloon hit the floor, or to pass their balloon to a partner. It went well, and parents told me they were going to make a trip to the Dollar Store on the way home to pick up pool noodles to make their own at home!

Finally…you are a Jedi. Come and receive your Lightsaber! 

I do not have great photos of this, unfortunately. But, here is how this worked. Once kids had completed all the stations my son would blow up a “balloon animal” balloon and twist it into a sword for these “Jedi-Knights No-Longer-In-Training”. The kids loved it.  We had a few ballons pop on their way to the car, but my son kept twisting and made replacements as needed. It also gave the kids something to take home along with their new droid and in addition to those Star Wars books they checked out!

Have you done a Star Wars program recently? I would love, love, love to hear your ideas! Please leave a comment below! May the Force be with you, my librarian friends!


Dinosaur Party!

Wow. That is just about all I can think after hosting our Dinosaur Party last week! It was one of our largest programs I have ever prepped for. We organized our summer reading program differently this year, and I planned our large family programs (like the Dinosaur Party) to run twice, once on Monday evening and again on Tuesday mornings. That way, we are able to offer our large programs to families who need to come in during the evenings, and for families where it works better to come in during the morning. And, because it was the same program, I only had one prep, set-up, and clean-up for two huge programs! What a labor saver!

I planned this out so that we had five activity stations. We had 11 tween/teen volunteers come to lead all the activity stations. That is them up above. 🙂 This is probably the most expensive program I have hosted so far this year, but even so, I would estimate I paid about $80 for everything we needed and the supplies served almost 200 people between both days!

The skinny: Our dinosaur party had a short introduction to bring the group together. This was basically me talking to the kids about dinosaurs, asking the kids to roar, and reading them Dinosaur Roar by Paul and Henrietta Stickland. I had other books to read just in case, including Saturday Night at the Dinosaur Stomp by Carol Diggory Shields but the kids were antsy to begin on the activity stations they saw as they came in. Another great idea is to sing “We are the Dinosaurs” by Laurie Berkner! But, we did one story, and then got right to business! The crowd broke out into five activity stations.  Volunteers manned each station which included making a dinosaur action figure, hatching dinosaur eggs, dinosaur tooth necklaces, dinosaur etchings, and finally a dinosaur fossil dig!

Cost: Again, about $80. Here is what I needed to purchase:

And here is what I already had:

  • Flour, and oil for the salt dough dinosaur tooth necklaces and dinosaur bones
  • Plain white copy paper for the Dinosaur Etchings
  • Red and White pony beads for the dinosaur necklaces
  • Baking soda and oil for the dinosaur eggs

Set-up: I put a large tarp in the middle of the floor (I think our tarp was 10’X10’. This is where kid sat when to begin the program. After the introduction time, we moved under bed storage containers of sand with buried dinosaur fossils onto this tarp. We had no sand mess. The tarp captured everything. Our janitor did not even know what we did the next day when he mopped the floor! I had the other four activity stations set up around the perimeter of the room. Also, I had the soundtrack to Jurassic Park playing on my CD player throughout the event, which helped set a great atmosphere.

A daycare donated dinosaur plastic decorations, so we taped those to the wall. I also made some fun signs using copyright free dinosaur images saying things like, “Dinosaur Crossing”, “T-Rex Zone”, and “Raptor Speed 40 MPH”.  We printed these out and also hung them on the wall. Here are my Dinosaur Signs.

Activity Stations:

Dinosaur Toy:

We made Glue-lee Printable Dinosaur from Krokotak. This is basically a dinosaur action figure that requires no glue or complicated assembly. So simple, even for younger kids! Kids just cut along the solid black lines, and fold along the single dotted line. They loved it. I copied the image template from their website and was able to resize it so that I could print two dinosaur templates on a standard 8.5”x11” piece of green cardstock.

Dinosaur Eggs

I bought a pack of 100 miniature dinosaurs from Amazon for $14 to “fill” the eggs. To make the eggs, I used the recipe from Fun at Home with Kids. Basically, you mix ½ a cup of baking soda in a small dish pan and add 2 Tablespoons of citric acid. Finally, add 1 teaspoon of oil and mix your dough. Your dough should be dry and crumbly, but able to stick together when you smoosh it under pressure. We needed more oil, though, so we added it in 1 teaspoon increments until our dough was wet enough to stick together. Take a small dinosaur and press the dough around it to cover it and make it look like an egg shape. Let your dough dry overnight. Even though the dough was crumbly when we worked with it, in the morning it was solid!

On the day of the party, I put out a large under bed storage container on the table, filled it with water, and told my teens to give out one egg to every child who came to the table. The kid simply dropped their egg into the water, and the dough began to fizz, eventually revealing the dinosaur as it appeared to “hatch” from the fizzing egg. Super exciting!

Dinosaur Tooth Necklaces:

We made four batches of salt dough using the recipe: 1 cup salt, 2 cups of flour, ¾ cup of water. I shaped the dough into dinosaur teeth about 2” in length. Before the dough dried, I poked a hole through the top at the top of each tooth so that we would be able to string them once they dried to make them into necklaces. The dough needed a few days to dry, but we had them on a shelf in our storage room, so it was not a big deal. You will want to turn the teeth over every day until they are totally dry, so that they will dry evenly. Or, bake them in the over on the lowest heat setting for a few hours. Once they were dry, we strung them with string. On the day of the party, I had the necklaces out with white and red beads. Kids were invited to choose a tooth and string beads on the string. Super fun!

Dinosaur Etchings:

I purchased some rubbing plates from Amazon for $8. I matched the plates we were given with FREE PRINTABLE dinosaur fact sheets from Ed Galaxy. That way, kids could make a rubbing, and learn something about their dinosaur at the same time! This again was a very popular station!


Finally, …drum roll….the Dino Dig  Station!

I bought four under bed storage containers and filled each with a bag of sand. We then made dinosaur-looking bones out of salt dough, and filled the containers with them. I set out paintbrushes in each container, so that kids could use the brushes to “paint” away the sand from the bones. I thought that kids would want to just dig in the sand with their hands, and they did, but nearly every one of them used the paintbrush to brush away the sand when they discovered a bone. Some kids wanted to keep them, but I told the volunteers to instead invite the kids to re-bury the bones. Super, super fun!

If you have ever wanted to plan a dinosaur party, do it! This program had a great mix of families and kids from birth-grade 5 came to play! It was one of our largest programs, and we had so much positive feedback during the event, and afterward on Facebook when parents posted great photos of their kids!

Have fun with dinosaurs!


Rock Painting

Hello library buddies! Right now we are in the midst of summer reading programming and our library has been humming! I try to take a break from regular programs for the last three weeks of May so that I have the flexibility to visit area schools to talk to students during assembles about the summer reading program, accommodate last minute requests from teachers to bring their classes to the library for a STEM program before school ends, and to finish all final SRP preparations. I am the only Youth Services Librarian at my library, and it takes those final three weeks to finish everything up so we are ready to go June 1st. That means that I am very anxious to see all our library families again, and June seems to fly by!

I just want to share about a program that we offered which I LOVED. In my town, rock painting and hiding is a big deal. Kids paint rocks all summer, and then hide them around town. Other kids and families look and find those rocks, re-hide them, and the cycle keeps going. It is basically a community-wide Easter egg hunt, but with painted rocks and it goes all summer. We even have a Facebook page about our community’s rock hunting! Access it HERE. So, rock painting was the first family program our library offered as part of the summer reading program.

I am offering something new this year with my programming schedule. This summer, I thought that we would offer a family-style program on Monday nights and on Tuesday mornings. That way, if parents/caregivers needed to come in the evening after working hours, they could on Mondays. If they already had commitments Monday night, they had the option of coming Tuesday morning. And, that way I am able to get two large programs done with one prep, one set-up, and one clean-up as we leave the program out and set-up on Monday night so we can do it again on Tuesday morning! Rock painting was the first program were I tried this schedule out, and it worked great. I heard from many parents/caregivers that having the Monday night/Tuesday morning option was working great for their family and made it easy for them to come to the library since they had both days as options!

The skinny on Rock Painting:

Cost: $0 (We had everything on hand. You probably do too!)

Supplies:
Rocks (Ask at a landscaping center to donate some!),
Washable paints in a variety of colors,
Paintbrushes,
Cups for water,
Dollar store plastic tablecloths (Unless you are okay with scrubbing washable paint off tables. We had to do this for some of our tables, and it was not that bad. But, tablecloths would help!)
Clear spray paint,
Baby wipes/paper towels.

Benefits: Low cost, program basically runs itself after set-up, works for all ages (babies-high school students), makes a great family program since it works for all ages, kids have the opportunity to be artistic, and afterwards, they enjoy the physical exercise of walking around the community and hiding their rocks.

This was a very low-stress program. I asked a local landscaping business, and they donated a 5-gallon pail of rocks. Kids painted all the rocks they wanted, and we did not go through all the rocks from that 5-gallon bucket. I also put out our washable paints, and when kids came in, a volunteer asked them what colors of paint they wanted. The volunteer then squirted a small amount of paint on a Styrofoam plate.

(NOTE: Last year when I offered rock painting the kids were allowed to pour the paint themselves. I would strongly recommend having a volunteer to do this for them. The kids poured out way more paint than they needed and we ended up wasting a lot of paint. Also, this is a great opportunity for a volunteer or staff to interact and welcome families to the program/library!)

We set up some tables, covered several of them with $1 tablecloths, and set out cups with paintbrushes and recycled plastic yogurt containers with water so kids could wash out their brushes. We also had some baby wipes and paper towels on hand for kids to wipe their brushes, or clean their fingers from the paints.

Kids from babies to high-schoolers happily painted for the whole hour that the program went on! Once the rocks were dry, we took them outside and sprayed them with clear spray paint to “fix” the washable paint on the rocks, so that the paint would not wash out when the rocks would get rained on.

Low cost, low prep, high interaction, the program basically runs itself, and a great opportunity for kids to be artists and then physically active as they walk around their community looking for places to hide their rocks! We will definately be doing this again!

Wisconsin Valley Library Service- STEAM in Youth Services Workshop

Tuesday, April 24th brought me to Wausau to present at the STEAM in Youth Services Workshop! Special thanks to Anne Hamland for inviting me! It was a wonderful time to share ideas that we have offered at Brewer Public Library, but I was especially interested in listening to the great ideas of my colleagues and hope to offer their programs at my library soon! 

Here is the PowerPoint presentation from my session time. All the programs that I talked about are linked to their blog post where I included all the resources I used to plan the program, cost, and how the program went:

Engaging Youth, Teens, and Families Around STEAM

I hope to visit my colleagues in the Wisconsin Valley Library Service soon!

littleBits in your Library’s STEAM Programming: Part 2

This is Part Two of my posts on littleBits programs we hosted at Brewer Public Library. Click here to read Part 1 where I explain the kits that our library is using, discounts available for librarians, and four lesson plans using the Workshop set.

Before last year, littleBits were not familiar to me. However, there is a very generous foundation in my city and they invited me to submit a grant on behalf of Brewer Public Library’s youth services department. I looked online for ideas of popular STEAM based programming at public libraries that I could use as models for my grant, and WHAM, I discovered littleBits. We have a very small budget at our library, and I try to stretch our funds out as much as I can (I budget $0.30 a child, and usually I try to do programs for less). This grant, though, allowed me to dream about programming options that I would never be able to offer otherwise.

I offered four littleBits programs in January, and parents/kids kept asking if I would continue the littleBits programs throughout February, so why not? Finding lesson plans was a little tricky, but we came up with four lessons that stretched the kid’s ideas about circuits. Our programs lasted from 30-60 minutes (including time at the end of kids to sort their littleBits and clean up). Also, we had attendees ranging from 5 years old to 12.

The videos were created to help promote the programs on Facebook. Many parents told me they came to the program just because they saw the video of what the kids would be creating. Click on the title of each lesson plan for links to outside resources that provided the inspiration for these lessons.

Lesson 5: Olympic Torches

Bits needed: Battery and cable, power, wire, latch, inverter, RGB LED.

Bit+Co. had a great lesson plan for birthday candles made from littleBits, and I just adapted it for Olympic torches. Again, I placed all bits required (power, cable, battery, wire, latch, inverter, and the RGB LED) into Ziploc bags ahead of time to not confuse kids about what bits they needed to make the project. I also had popsicle sticks, rubber bands, tissue paper, and tape out on tables. After creating their torch, I opened up all the littleBits to them for free exploration.

Lesson 6: Three Wheeler

Bits needed: Battery and cable, power, DC motor, light sensor, wire (2), wooden skewer, cardboard circles for wheels.

Full disclosure: This program did not work when we did in on program day. Sure, it worked for me when I tested the lesson plan out. Sure, it worked for the three kids who peaked around my desk to see what I was doing and wanted to make one to. But, on the day, it was a real opportunity to let the kids know that science and engineering is about working through challenges. We used chopsticks and cardboard cut out into circles for the wheels and axles, which did work, but I think that using LEGO wheels and axles would work better. However, all the kids were able to get their three-wheeler working before the end of the hour program!

Lesson 7: Art Bot

Bits needed: Battery and cable, power, DC motor, chalk/crayon/marker, rubber bands.

Again, full disclosure, we had a hard time getting this one to work too. But, all the kids were able to get it working in some capacity, and again, it was a good moment to let kids know that it is okay to struggle.

Lesson 8: Backpack Security

Bits needed: Battery and cable, power, light sensor, pulse, buzzer, screwdriver. We ended our programming on a high note with this one! Kids loved the idea of a security system at school that they could build for themselves!

More Lesson Plan to Try: 

While looking for lesson plans I found sever more that would be great to try in the future! If you have already done these, let me know!

Inchworm

Olympic Skier


Kids STEM Lab: Paper Airplanes

Building paper airplanes is the stuff of kids and imaginations! Intentionally incorporate some physics vocabulary terms, with some experimentation time, and you have a fun program to interest kids of all ages!

The skinny: This was one of the more challenging programs I have done. I try to plan our STEM programs so families can come together, and we have kids who are three years old with siblings who are ten years old. That is a big age difference, but my most successful programs happen when I am able to find activities that allow kids of differing abilities to acomplish the activity successfully. Airplanes are hard because making folds in paper according to directions is not something that young kids intuitively know how to do. But, it was a great exercise in showing kids how to follow directions, a necessary skill in STEM.

The cost: $0. I set out some white copy paper, pink construction paper, and masking tape. We also set out pennies from past programs that we keep saving and re-using.  We already had all these supplies on hand, but if you needed to purchase the paper and masking tape, I would estimate maybe $5 in supplies. At most.

Resources: There are great blog posts out there on airplane STEM, but two of my favorites planning this program were Airplane Science by the Show Me Librarian and STEM Paper Airplane Challenge by Kids Activities. I also utelized the book, Paper Airplanes by Jenny Fretland VanVoorst.

  How it went: We began the program by sitting in a circle and talking about paper airplanes that we had all built in the past. Kids have great stories about planes they have built and the different “flight” patterns their planes exhibited, and it was a great way to build comradery in the group and practice conversation skills. By the way, I had kids in the program as young as two and as old as ten. I then took out the book, Paper Airplanes by Jenny Fretland VanVoorst. Depending on the group you might want to read the whole book, or, especially focus on pages 12-19. For our program, we focused on the physics vocabulary terms” Gravity, Thrust, Lift, and Drag. After reading the book I wrote those four words on the whiteboard and we talked a little bit more about those terms with an example paper airplane.

Then, it was time to build! I had a copy of instructions for the classic paper airplane open on the table similar to these instructions. Some of the kids were able to fold the paper into the pattern, and some of the kids needed help. No problem. After building their plane and testing it out, I invited the kids to tape down pennies on the wings, bottom, and sides of their plane. The challenge was to see which plane could carry the most money “cargo”. After the kids had taped their pennies down, we had a contest of sorts where the kids were able to line up and fly their airplanes. WARNING: be sure that no one is in the way when the planes go off! Pennies will fly off the planes, so just be careful! No one got hurt, lots of kids were laughing and smiling, and parents chuckled to see their kids having so much fun. It was also a good way to practice safety instructions, which will be helpful as these kids keep advancing in school and taking science courses.

The kids loved seeing their planes fly! We went back and forth between flying and going back to the work tables to tweak designs. In the end, I think we had about 12 rounds of flying the planes before having everyone sit down in a circle again. We talked about our four physics vocabulary words that help explain the forces behind why paper airplanes fly (and crash). I also was able to ask the kids how much money cargo their plane was carrying at the last round. After a few minutes of sharing, I asked the kids to help me pick up pennies that had dropped to the floor. Kids asked to keep their airplanes, which was a good sign they had enjoyed themselves. One mom commented that during a snow we had about a week ago her sons had built 70 paper airplanes in one afternoon! However, they did not know how to fold them correctly, so none of them flew as well as her sons wanted. She specifically brought her boys to this program to learn how to fold their paper airplane so it would fly, and I think her sons were some of the proudest children all evening of what they were able to build by following the directions.

Have you done a paper airplane STEM program at your library? I would love to hear about it!

STEM Themed Valentine’s Day Party

Valentine’s Day. For some, just the mention of it brings smiles, for others groans. For myself, I have always appreciated the day as a time to remember family and friends who I care about. And, for the elementary school children who still make Valentine’s day bags and boxes and exchange valentines, it seems that the day is a positive one for them as well. What to do when a library STEM program falls on this special holiday? Plan a Valentine’s Day STEM Party, of course!

The skinny: This was a fun program because I gave myself a constraint: I wanted to create multiple activity stations that all used Valentine’s Day conversation candy hearts. In the end, I was able to design five different activity stations, and after each program, I polled the kids to find out which stations were their favorite. Each station received approximately the same number of votes after running the program five times for five different classes. So, you can be sure that there will be activities here that your kids will enjoy. What I also liked about these activity stations was that they were easy enough for three-year-olds to do successfully on their own, but fun enough for fifth graders to also spend an hour with. This made a great multi-age program, making it perfect for families.

Cost: $30 for all the supplies. I ran this program five times, with brought the cost to about $0.40 per child. But, there were lots of supplies that we did not go through, so it gave me lots of extras for next time. Once I had the stations set up I just kept the supplies on a table in my storage room and brought out the activities for each class as they came to the library for the program, so we were able to use all the supplies over and over. The only casualty was the hearts that we used in the boat building station. Those dissolve in the water after an hour, so be prepared to throw those away (and have a sink nearby for kids to wash their hands!)

Preparation: I set up five tables, each with a different station. I also went online and added some photos of examples of the station to a PowerPoint slide which I printed out and placed at each table as a table-topper so that the kids could see at a glance what the challenge was at each table. I wrote out a few instructions, and voila! Done! Here is a PDF of all the table toppers I had out. All the photos are my own.

Valentine’s Day STEM- Candy Hearts Table Toppers

Resources: I utilized two blogs for the activity stations. Please check out STEM Activities for Kids and Joy in the Works blogs!

How it went: We had five stations for this program:

Candy Heart Wall

Supplies needed:  Candy hearts, straws.

Heart Bridge

Supplies needed: Candy hearts, index cards, plastic cups.

Candy Heart Chute

Supplies needed: Candy hearts, plastic cups, toilet paper rolls, old cardboard, boxes, clothespins…basically any supplies you have in your craft room. Just set it out and watch kids figure out creative solutions with it!

Candy Heart Boat

Supplies needed: Candy hearts, tin foil, containers for water.

Candy Heart Catapult

Supplies needed: Candy hearts, tongue depressors, spoons, rubber bands.

This was a very fun program! It reminded me of my Valentine’s Day party when I was in Kindergarten! We had been doing lots of very specific STEM programs over the past few months, and having multiple activity stations that kids were free to choose and spend as much time as they liked with was a welcome change, for the kids and me. We began with some circle time (all the kids and myself sit in a circle) and we had a great conversation as our program opener about Valentine’s Day, how the kids decorated their boxes, who they care about, etc. Then, I walked around the room and introduced each station by telling kids what the challenge was and what supplies they had to work with. I told them they were free to go where they wanted to but to try to get to all five stations before the hour was up. After that, it was time to ask them to use walking feet to choose the station they wanted to try first! I also did this with a class that needed more structure, and we timed it so that groups of four students were at each station for ten minutes (which seemed like a great amount of time for them).

This program was very relaxed, and parents/grandparents/teachers were able to walk around and participate as much as the kids. Even the stations that I had worries about turned out to be incredibly popular, such as the Build a Candy Heart Wall. I watched the kids work on their walls for 10-15 minutes, in kind of relaxed zen-like state. It was wonderful. After an hour I invited the kids to come back into a circle and asked anyone who had something to share to raise their hand. We went through multiple comments, and then I took a poll to find out which station was the most popular.

And, that is a wrap! I hope everyone is having a wonderful February. Spring is on the way!

Go back in history with a Renaissance Faire!

In the frigid cold of January, on a magical Saturday, our library was transformed into a warm castle of medieval times for a community Renaissance Faire. And, a merry time was had by the volunteers and families who enjoyed costumes, food, crafts, and activities belonging to a time long gone by. This is the first kind of “living-history” program I have hosted, and I think it is one of my top five favorite library programs we have ever offered. So, if you are looking for something totally different to liven up your programming, and something totally budget-friendly, read on!

Read more

Kids’ STEM Labs: Newspaper Geodesic Domes

You never know where an idea for a STEM Lab will come to you. For this project, it was while driving to Grandma’s house over Christmas break. My son needed to create a geometry project that was due the day after break ended. Although my son knew about this project in October, like any teenager, he had procrastinated. So, when my husband realized that our son had not yet begun to work on this project, and it was due in a few days, he went into brainstorming mode. The result? My historian husband began talking about geodesic domes. These domes are made completely out of triangles, yet, they have the strength of rounded arches! They do not require any internal support or walls, in a natural disaster, they are one of the safest structures. Obviously, this means we need to plan a STEM Lab around them! Read more

LEGO Expo

Kids and Legos. Is there a better combination? I am not sure. But, I do know that a LEGO Expo was one program that I had on my wish-list all year, and at the end of November, we made it happen!

This program was both difficult, and easy. I usually have Legos out in the children’s library on Tuesdays after school for kids to come in and build with freely. But, for this Lego Expo, I wanted the kids to be able to show off the projects that they work so hard to build. I heard a great idea from a colleague (thank you, Kelly!) about how her library hosts Expos, where kids are invited to build their Lego project at home, and then bring them to the library to be entered in the contest! A judge comes and awards certificates! Kids gain recognition for their creations! And, the Lego projects are left at the library for several days/ weeks for community members to see and enjoy viewing what kids built. Sounds like a win-win all the way around! Read more

Fall LEGO Building Challenges

Thousands of tiny LEGO pieces on the floor… kids working to recreate a photo from tiny bricks…kids and caregivers taking a break to have a moment of time where their only responsibility is to be creative…and lots of requests for photos of their completed work. Sounds like a great Kids’ STEM Lab to me! We hosted a fall themed LEGO building challenge, and even though it was super low prep, I think this was one of my favorite programs so far! We had a small handful of kids at the beginning of the program, but the open-ended nature of the project drew in more kids who did not know there was a program going on, but wanted to join in!

The skinny: This was a FREE program for us because we already had the LEGOs. The STEM Laboratory offered a free download of photos representing fall objects (black cat, tractor, pumpkin, apple pie, among others). You need to give your email address to access the free download. This program was very open ended, so it would make a great activity if you know kids will drop in, and not necessarily be there at the beginning.

Read more

Diary of a Wimpy Kid Party: The Getaway

The 12th book in the Diary of a Wimpy Kid series, The Getaway was released yesterday, November 7, 2017! Could our library let an occasion like that go unnoticed? I think not! We hosted a Book Launch party complete with games, activities, mom bucks, and presented a copy of the newly released book to a very happy elementary school student. Definitely a lot of fun. Definitely, something I want to do again (and, as quickly as Jeff Kinney seems to be able to get these books out, that will not be long!).

This is the first DOAWK party that I have planned, so I looked to my colleagues for inspiration and support. After an internet search, I found many blog entries incredibly helpful in brainstorming some ideas (I included a list of blog posts and resources that were especially helpful at the end of this post. Check it out!).

On the day of the party, I set out a copy of the Diary of a Wimpy Kid paper scavenger hunt from Thrive After Three as well as a drawing page for kids to be able to design their own book covers so that kids who arrived early right from school would have something to do.  Both of these documents needed a little editing. I cut off the bottom of the scavenger hunt form and updated the information to promote The Getaway. I also cut off the top of the book cover design page, and just ran off copies of my physically shorter page. The kids never knew the difference.

When the kids arrived at 4:00 p.m.  it was party time! We began by sitting in a circle and I asked each kid to tell me what their favorite Diary of a Wimpy Kid book was, and why. Then, I told them just briefly that The Getaway is about the Heffley family spending Christmas vacation in Mexico, and instead of it being a relaxing trip, everything goes wrong. I then asked the kids to tell me about a trip that they went on where things either went well and they had fun, or things went wrong.

These conversations took up maybe 8 minutes, but they were a great way to get started, and it gave us some time for kids who were coming in late to feel that they were not missing anything.

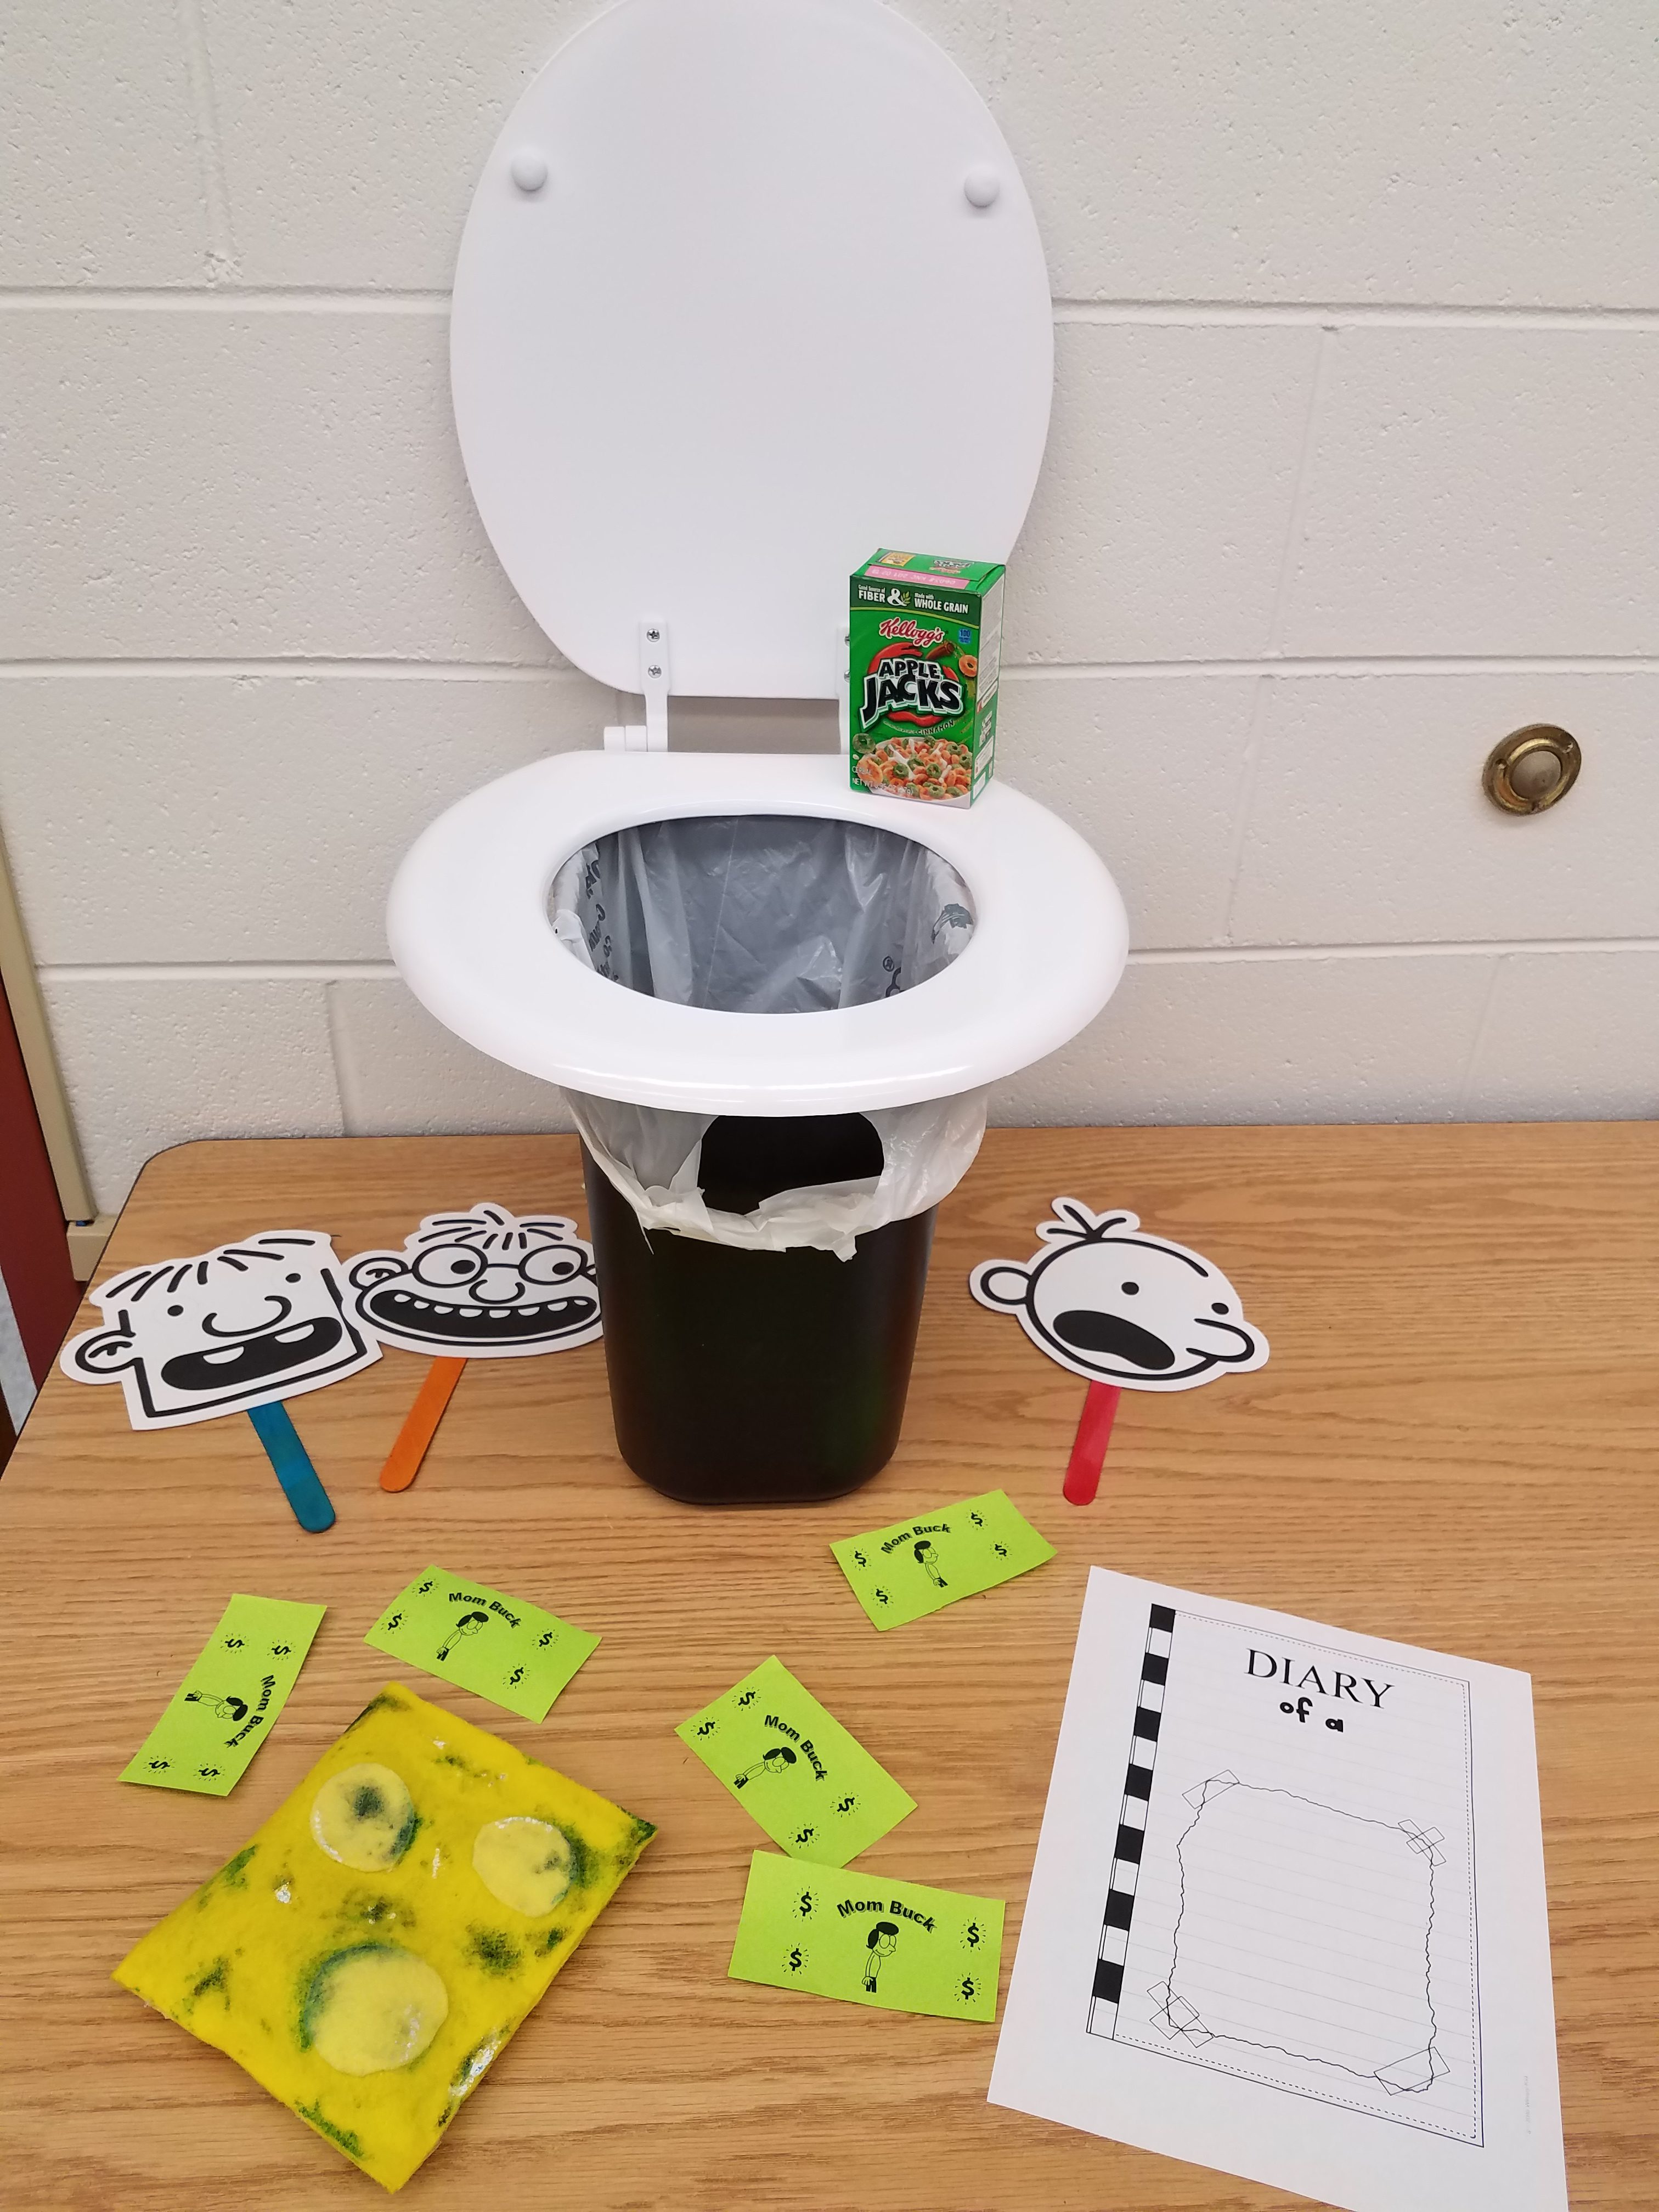
Then, we transitioned to a game of Cheese Touch. It is like the game, “hot potato”. I asked the kids to remind me what the cheese touch was. After hearing how they described it, (“It is like being infected”) I showed the kids the Moldy Cheese bean bag I had made. This is just a bean bag covered in yellow felt. A friend used markers and white-out to create the mold effects. I told the kids that I was going to play some music, and they needed to throw the bean bag around to each other. I would randomly pause the music, and the child holding the beanbag, or the last person to have touched it, was out. I used the “Capitol Kids Christmas” CD and used the Twelve Days of Christmas track because it had the faster beat that I wanted to keep the energy up. The kids loved this, and we played three games. When I do this over, we will spend more time on this, because it was a favorite!

Read more

Spiders!

Creepy Crawlies! Spiders! Webs in the dark! Does it give your give you goose-bumps just thinking about it? Add kids and a few lessons about the science of arachnids, and you have a program that gives new perspective on a creature that inspires most to squirm…or scream!

The skinny: We hosted this program days before Halloween. I wanted to give the kids who came a different way of appreciating spiders, because I used to be very afraid of them myself. This program lends itself to a host of fun ideas, but in the end we read a book together that give great information on spiders in a humorous information style, walked through an interactive Prezi presentation, and finally tried our hands at building our own spider’s web while working on some fine-motor skills and problem-solving techniques.

The cost: Pennies. Literally. I would estimate that we paid about $0.05 for each child for the single paper plate and the yarn.

Read more